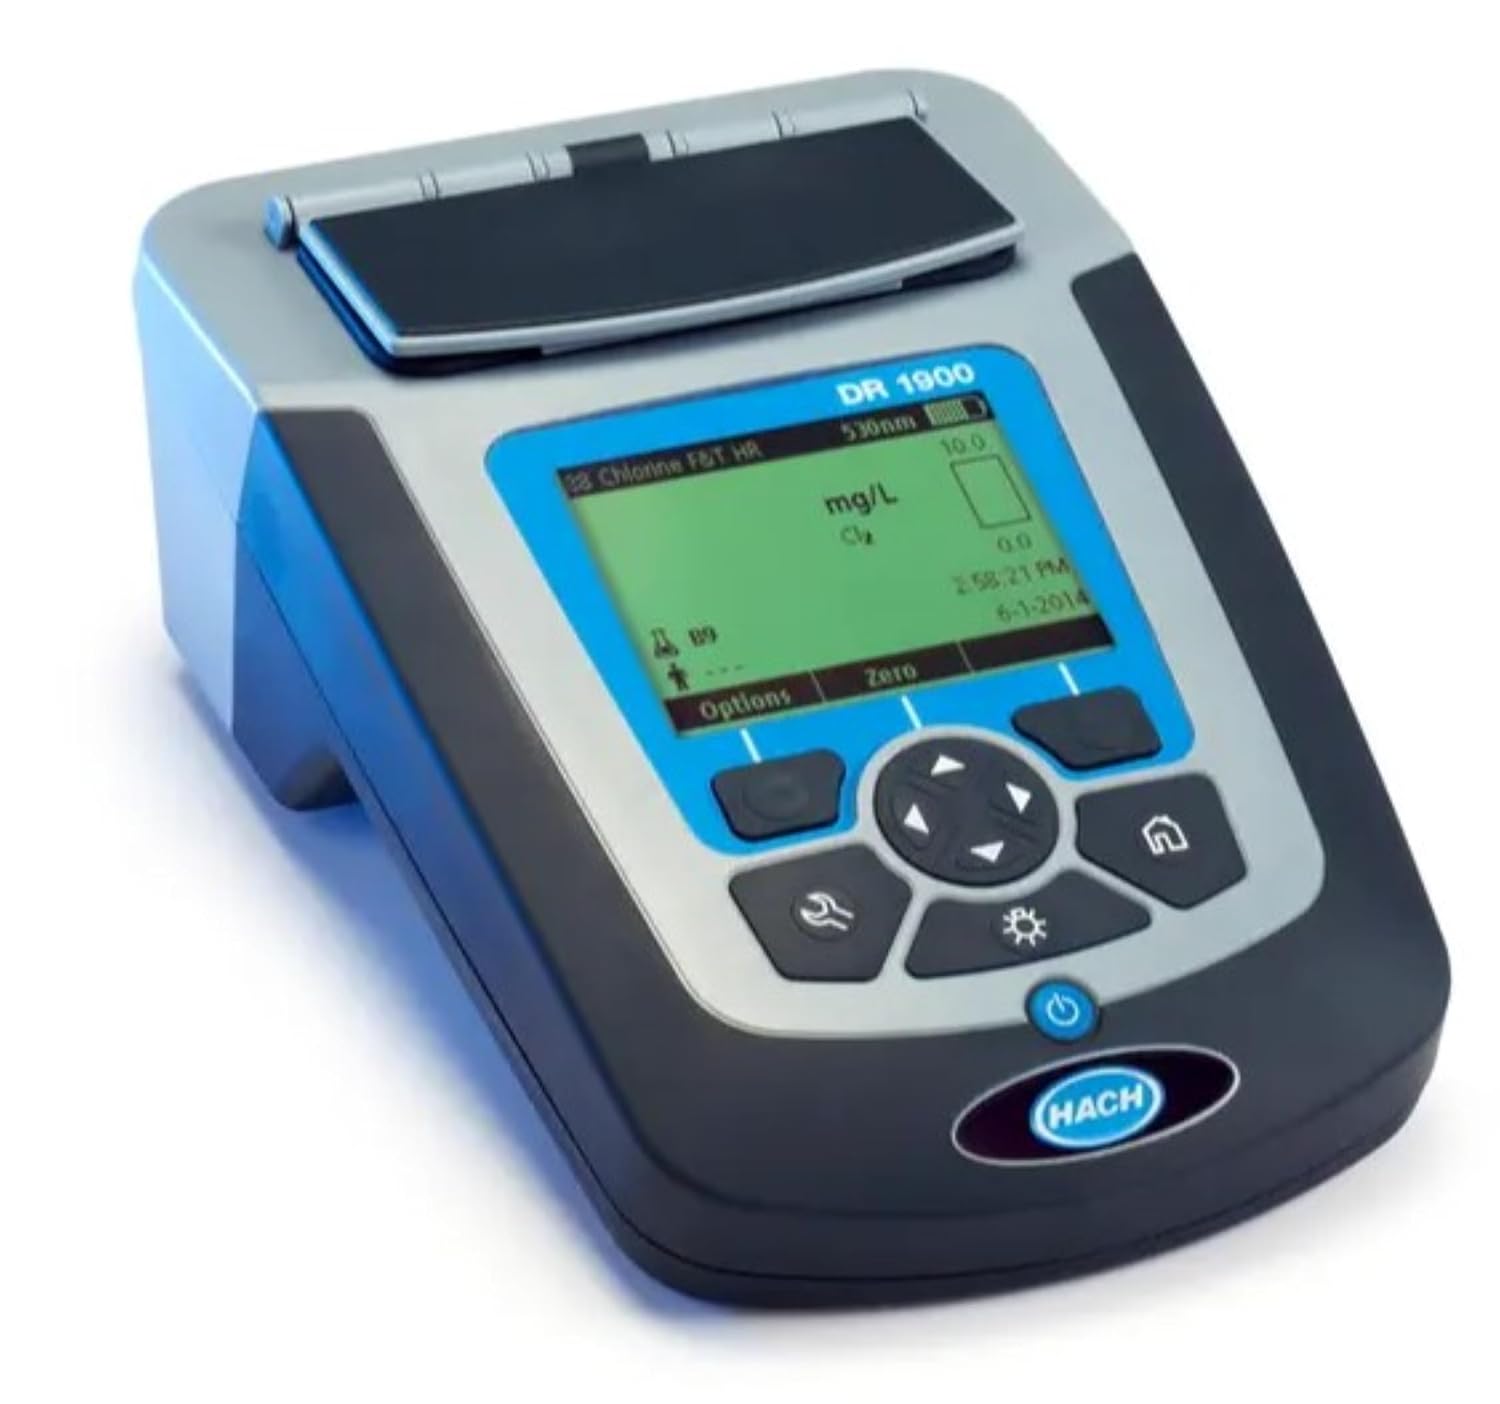
Hach DR1900 Portable Spectrophotometer: Complete Review & Reference (2026)
Source: Hach DR1900 User Manual DOC022.53.80343, Edition 2 (August 2017) • DOC0229780343
340–800 nm Xenon Flash Lamp • IP67 • 500-Point GLP Data Log • 50 Operator IDs • 100 Sample IDs • Multi-Wavelength & Time Course Modes
DR1900 vs DR900 — Colorimeter vs Spectrophotometer
The most important distinction in the Hach portable instrument lineup is the difference between a colorimeter (DR300, DR900) and a spectrophotometer (DR1900). Both measure the absorbance of colored solutions to determine analyte concentration — but they do so in fundamentally different ways that affect capability, accuracy, and appropriate application.
Automatic wavelength selection from 4 options
10 operator IDs / 10 sample IDs
500-result data log
No multi-wavelength mode
No time course mode
No password protection
No wavelength scan capability
Lower instrument cost
Best for: routine single-parameter monitoring with established methods
Xenon flash lamp — no warm-up, consistent output
50 operator IDs / 100 sample IDs
500-result GLP data log
Multi-wavelength mode (up to 4 simultaneous)
Time course mode (reaction kinetics, BOD)
Password protection for calibration/programs
My Workflow for parallel sample batches
Verification Kit LZV537 for traceable QA
Best for: multi-parameter field labs, compliance monitoring, custom method development
| Feature | DR300 (Single-Param) | DR900 (Colorimeter) | DR1900 (Spectrophotometer) |
|---|---|---|---|
| Wavelength type | 1 fixed LED | 4 fixed LEDs | 340–800 nm continuous |
| Light source | LED | LED (4×) | Xenon flash lamp |
| Spectral bandwidth | Narrow LED | Narrow LED | 5 nm |
| Multi-wavelength mode | No | No | Yes (up to 4 λ) |
| Time course mode | No | No | Yes |
| My Workflow | No | No | Yes |
| Operator IDs | None | 10 | 50 |
| Sample IDs | None | 10 | 100 |
| Password protection | No | No | Yes |
| User programs | None | 10 | 100 |
| Verification kit support | No | No | Yes (LZV537) |
| IP rating | IP67 | IP67 | IP67 (cover closed) |
| Power | 4× AAA | 4× AA | 4× AA |
Optical Engine — Xenon Flash Lamp Technology
The xenon flash lamp is what separates the DR1900 from LED-based colorimeters at the fundamental physics level. Instead of selecting from a handful of discrete LED wavelengths, the xenon lamp produces a continuous, high-intensity broadband output across the full 340–800 nm visible spectrum with each flash. A diffraction grating then separates this white light, and a slit selects the precise measurement wavelength at 1 nm resolution.
No warm-up period needed — xenon flash reaches full output instantly. Extended lamp lifetime vs tungsten-halogen. Low power consumption compatible with battery operation. High-intensity pulses produce stray light below 0.5% T at 340 nm — better than most bench-top colorimeters.
5 nm spectral bandwidth at 1 nm wavelength resolution means the DR1900 can discriminate overlapping spectral peaks that LED colorimeters at fixed wavelengths cannot. This is the critical capability for multi-component analysis and custom method development.
Sample Cell Compatibility — Complete Reference
The DR1900 accepts more sample cell formats than any other instrument in the DR portable series, through four interchangeable adapters (A, B, C, D). The adapter is changed without tools by aligning the arrow on the adapter top surface with the arrow on the cell compartment rim. Always verify the correct adapter is installed before beginning measurements — the wrong adapter shifts the optical path and invalidates results.
| Adapter | Cell Type | Dimensions / Volume | Common Use |
|---|---|---|---|
| A | 1-inch square rectangular cell | 10 mL, 10 mm path | Most Hach stored programs; ships as standard matched pair with instrument |
| A | 16 mm round cell | Varies by method | LCK/TNTplus vial methods |
| B | 13 mm round cell | Varies | Select reagent kit methods |
| B | 25 mm round cell (1-inch) | 10 mL | DR300-compatible methods (DPD chlorine, FerroVer iron, PhosVer phosphate) |
| C | 20 mm square cell | Varies | High-path-length methods for trace analysis |
| C | Flow-through cell | Continuous flow | On-line process monitoring configurations |
| D | 50 mm path length cell | Large volume | Ultra-trace analysis requiring extended path length for sensitivity |
| No adapter | AccuVac® ampuls | Self-fill vacuum ampuls | Methods with AccuVac format reagents (chlorine, phosphate, iron, others) |
| Adapter orientation: align arrow on adapter with arrow on cell compartment rim. Replace without tools at any time. | |||
Standard Measurement Workflow
Power on — no warm-up required
Press POWER. The xenon flash lamp reaches full output immediately — no warm-up delay unlike tungsten-halogen sources. The reading screen displays the last used program and current battery level.
Select program from Stored Programs, LCK/TNTplus, or Favorites
Press SETTINGS → All Programs/Methods. Search by number (Select by number) or alphabetically (Select by letter). For frequently used methods, add to Favorites first for one-touch access from the home screen. Press Start to activate the selected method.
Assign Operator ID and Sample ID
Press Options → Operator ID to select the active operator. Press Options → Sample ID to assign the sample location. Both are tagged to every reading stored in the data log. For sequential repeat samples from the same location, the instrument auto-increments the sample number (e.g., River_A (001), River_A (002)).
Zero with blank cell — sample matrix compensation
Fill the appropriate cell with sample water (no reagent). Wipe the exterior with a lint-free cloth. Insert cell with correct adapter installed. Press Zero (RIGHT selection key). The instrument subtracts the sample matrix absorbance from subsequent readings — critical for turbid or colored samples where the matrix itself contributes absorbance.
Prepare sample cell with reagent per method procedure
Follow the specific method document for reagent type, quantity, mixing procedure, and reaction time. Reaction times are not suggestions — color development is time-dependent. Wipe the exterior clean with a lint-free cloth before inserting.
Insert sample cell — verify adapter — press Read
Confirm the correct adapter is installed for the cell type in use. Insert the reagent cell. Close the sample cell cover (maintains IP67 rating). Press Read. Result displays in the configured unit with the active wavelength shown on screen.
Reading is auto-stored to GLP data log
Every reading is automatically saved with: result value and unit, measurement date and time, sample ID, operator ID, program name and number. Data log capacity is 500 readings on a FIFO basis. Export via USB before the log fills to preserve records.
Over-range: “+++” / Under-range: “---”
+++: concentration exceeds the method upper limit — dilute sample with reagent-demand-free water, retest, multiply result by dilution factor. ---: below detection limit — verify reagent addition, check reagent expiry, confirm procedure was followed correctly.
Three Advanced Photometer Modes
Beyond stored program selection, the DR1900 provides three flexible photometer function modes for experienced operators performing measurements outside the pre-programmed library. Access via SETTINGS → Photometer Functions.
My Workflow — Parallel Multi-Sample Field Collection
My Workflow is the DR1900 feature most valuable to field teams collecting multiple samples simultaneously from different monitoring locations. It allows a single operator to manage a named batch of samples — each in its own numbered tab — without mixing up which reading belongs to which location.
Create a new workflow: SETTINGS → My Workflow → Options → New My Workflow
Select the analytical program, enter the total number of samples in the batch, and assign a workflow name. The instrument creates sequentially numbered tabs prefixed with the workflow name.
Use LEFT/RIGHT arrows to switch between sample tabs
Each tab is independent — perform Zero and Read operations for each tab as samples are processed. There is no requirement to complete samples in order; toggle between tabs at any time.
Customize tab names with location identifiers
Press Options → Edit My Workflow to rename tabs from sequential numbers to meaningful location names (e.g., "Inlet," "Basin 1," "Effluent"). Renamed tabs persist throughout the workflow session.
All readings stored as a named batch in the data log
Every reading in the workflow is tagged with the workflow name and tab identifier, keeping the complete batch organized as a unit in the 500-point GLP data log. Press Options → Delete My Workflow to remove a completed workflow.
Operator ID & Sample ID — GLP Data Traceability
| Feature | DR300 | DR900 | DR1900 |
|---|---|---|---|
| Operator IDs | None | 10 | 50 |
| Sample IDs | None | 10 | 100 |
| Auto-sequential numbering | No | No | Yes — River_A (001), (002)… |
| GLP metadata per result | None | Basic | Value, unit, date, time, operator ID, sample ID, program name/number |
To manage Operator IDs: press Options → Operator ID from the reading screen. Create, select, or delete IDs (maximum 50). To manage Sample IDs: press Options → Sample ID. Create, select, or delete IDs (maximum 100). Sequential numbering is applied automatically for repeat samples — each new reading from the same location increments the counter without manual re-entry.
User Programs — 100 Custom Methods
The DR1900 supports up to 100 user-defined programs, allowing laboratories to create validated custom methods for parameters not covered by the factory-stored program library or to modify existing methods for site-specific matrix corrections.
Navigate: SETTINGS → Favorites/User Programs → User Programs → New Program
Opens the user program creation interface.
Define program parameters
Set: program name; measurement wavelength (any wavelength 340–800 nm at 1 nm steps); result unit; result resolution; chemical formulas for concentration calculation (up to 4 formulas); calibration formula; upper and lower reporting limits.
Add timers (up to 4 steps)
Each user program can include up to 4 timed steps with countdown prompts — essential for methods with mandatory reaction times between reagent additions or between mixing and reading.
Save and add to Favorites
The program is saved to the User Programs list. Add to Favorites for immediate access from the home screen without navigating the full program library.
Quality Assurance — Three Optical System Checks
The DR1900's built-in optical check routines allow in-field verification of instrument performance without external calibration services. Access via SETTINGS → Setup → System Checks → Optical Checks. Run all three checks whenever a regulatory compliance program requires documented QA, after instrument repair or service, or whenever results appear anomalous.
Wavelength Check — Accuracy at 807 nm
Navigate: Optical Checks → Wavelength Check. Insert the Neodym or BG20/2 test filter as prompted. Follow on-screen prompts. Compare the result against the certified value for your specific filter. If outside tolerance, contact Hach — do not continue regulated measurements. The wavelength check is the primary verification that the optical system is properly calibrated.
Absorbance Check — Photometric Accuracy
Navigate: Optical Checks → Absorbance Check → Options → λ → enter the wavelength specified for your test filter. Insert the absorbance test filter. Compare against certified filter values. Out-of-tolerance results require manufacturer contact before any further regulated testing.
Stray Light Check — Must be <0.5% T
Navigate: Optical Checks → Stray Light Check. Insert the stray light test filter (NaNO₂ solution or equivalent) as prompted. Result must be less than 0.5% T to confirm the DR1900 meets its published specification. Stray light above 0.5% T at 340 nm will cause positive bias in measurements at low wavelengths.
Verification Kit LZV537 — Traceable QA Reference
The optional Verification Kit LZV537 provides the most comprehensive, traceable QA check available for the DR1900. It contains six precision glass filters with certified target values and tolerances for stray light, photometric accuracy, and wavelength accuracy across multiple wavelengths — enabling ISO 17025-compatible instrument verification documentation. Navigate: SETTINGS → Setup → System Checks → Optical Checks → Verification Kit. Recommended for all compliance monitoring programs and regulated laboratory applications.
Full Technical Specifications
Physical & Environmental
| Specification | Value |
|---|---|
| Dimensions (L × W × H) | 178 × 261 × 98 mm |
| Weight | 1.5 kg |
| IP Rating | IP67 with sample cell cover closed (1 m submersion, 30 min) |
| Operating temperature | 10–40°C |
| Storage temperature | −20 to +60°C (without batteries) |
| Relative humidity | 10–90% non-condensing |
| Power source | 4× AA alkaline or rechargeable NiMH (charging module optional) |
| Auto-shutoff | 30 minutes (default); disabled when on AC power |
| Display | Backlit graphic LCD |
| Keypad | 6-key: POWER, HOME, SETTINGS, BACKLIGHT, d-pad, 2 soft keys |
Optical & Photometric
| Specification | Value |
|---|---|
| Wavelength range | 340–800 nm |
| Light source | Xenon flash lamp |
| Spectral bandwidth | 5 nm |
| Wavelength resolution | 1 nm |
| Wavelength accuracy | Verified by Wavelength Check procedure at 807 nm |
| Photometric accuracy | ±3 mAbs at low absorbance values |
| Photometric linearity | <0.5% deviation up to 2 Abs |
| Stray light | <0.5% T at 340 nm |
| Photometric range | 0–2.5 Abs (corresponding to approximately 0–99.7% T) |
| Warm-up time | None — xenon flash lamp reaches full output immediately |
Data & Software
| Specification | Value |
|---|---|
| Data log capacity | 500 results (FIFO) |
| GLP metadata per result | Value, unit, date, time, operator ID, sample ID, program name, program number |
| Operator IDs | Up to 50 named IDs |
| Sample IDs | Up to 100 named IDs with auto-sequential numbering |
| User programs | Up to 100 custom programs |
| Data export | USB (type A) — data log exported as CSV file |
| Firmware update | Via USB from PC |
| Password protection | Setup menus, operator ID editing, K factor editing, user programs, My Workflow, data log deletion |
| Languages supported | Multiple — selectable via SETTINGS → Setup → Language |
Maintenance Reference
Instrument Exterior
Clean with a moist cloth and mild soap. Wipe dry immediately. Do not use abrasive cleaners, solvents, or high-pressure water — these compromise the IP67 enclosure seal. The IP67 rating applies only when the battery compartment screws are properly tightened and the sample cell cover is fully closed.
Cell Compartment Cleaning
Sample Cell Cleaning
| Cleaning Type | Procedure | When Required |
|---|---|---|
| Standard cleaning | Laboratory detergent (e.g., Liquinox) at recommended concentration; elevated temperature or ultrasonic bath; minimum 3 rinses with deionised water; air dry only — never paper towels on optical surfaces | After every use; standard parameters |
| Acid cleaning | Soak in dilute nitric or hydrochloric acid per method specification; rinse thoroughly with deionised water; wear acid-resistant PPE | Mandatory for all low-level metal determinations |
| Cell replacement | Discard cells with any visible scratch or optical etching — do not continue using scratched cells | When optical surfaces are scratched or permanently contaminated |
Battery Replacement
Troubleshooting Guide
| Symptom | Likely Cause | Resolution |
|---|---|---|
| “+++” over-range | Sample concentration above method upper limit | Dilute with reagent-demand-free water; retest; multiply result by dilution factor |
| “---” under-range | Below detection limit; reagent not added; procedural error | Verify reagent addition; check procedure; verify reagent expiry; repeat test |
| Erratic readings in sunlight | Stray ambient light entering open cell compartment | Install the protective cover; shade the instrument from direct sunlight |
| High blank reading | Cell contamination; previous reagent carryover; scratched cell | Clean or replace the sample cell; use triple-rinse procedure before measurement fill |
| Inconsistent replicates | Reaction time not observed; insufficient mixing; cell not wiped; temperature variation | Follow method procedure exactly; wipe cell exterior before every insertion |
| Wavelength check failure | Optical system drift; damaged test filter; wrong filter inserted | Verify correct filter inserted per on-screen prompt; contact Hach if failure persists |
| Absorbance check out of tolerance | Xenon lamp degradation; contaminated cell compartment; wrong filter | Clean cell compartment with bulb; verify correct filter; contact Hach |
| Stray light >0.5% T | Optical system degradation; contaminated optical surfaces | Do not use for regulated measurements; contact Hach technical support |
| Will not power on | Dead or incorrectly installed batteries; battery compartment not sealed | Replace all 4 AA batteries; verify correct orientation; tighten battery cover screws |
| USB data export fails | Cable not fully seated; instrument powered off; USB driver issue | Reconnect cable with instrument powered on; use different USB port on PC; update firmware |
| Password forgotten | Administrator-level access needed | Contact Hach technical support — instrument may require factory reset |
Replacement Parts & Optional Accessories
Standard Replacement Parts
| Item | Notes |
|---|---|
| 1-inch square matched cell pair (10 mL) | Ships with instrument; replace when scratched or etched |
| Cell adapters A, B, C, D | One set ships with instrument; order replacement if lost or damaged |
| Batteries, AA alkaline (4-pack) | Standard AA alkaline; do not use rechargeable without NiMH module |
| Protective cover (sample cell compartment) | Required for bright-light field operation with open-top cells |
| Dust cover | Ships with instrument; protects optical compartment during storage |
Optional Accessories
| Accessory | Purpose |
|---|---|
| Verification Kit LZV537 | Six precision glass filters; certified values for stray light, photometric accuracy, and wavelength accuracy; required for ISO 17025 and regulatory QA documentation |
| NiMH Battery Charging Module | Enables use of rechargeable NiMH AA batteries; includes module and compatible NiMH cells |
| USB+Power Module | Enables AC power operation (disables auto-shutoff); also provides USB connectivity for data export |
| Flow-through cell | For continuous-flow or on-line sampling configurations; requires Adapter C |
| 50 mm path length cell | For ultra-trace analysis requiring extended optical path for sensitivity; requires Adapter D |
| Wavelength check filter (Neodym or BG20/2) | For Wavelength Check QA procedure; purchase separately if not included with instrument |
| Stray light test filter (NaNO₂) | For Stray Light Check QA procedure |
Applications — Drinking Water, Wastewater & Industrial
| Sector | Key Parameters | Mode Used |
|---|---|---|
| Drinking water treatment | Free/combined/total chlorine; fluoride; nitrate/nitrite; iron; manganese; ammonia; turbidity surrogates; colour | Stored programs; LCK/TNTplus methods |
| Wastewater compliance | COD; total nitrogen; total phosphorus; BOD; suspended solids surrogates; heavy metals (lead, copper, zinc, chromium) | Stored programs; Time Course (BOD) |
| Cooling tower chemistry | Biocide residuals; phosphonate inhibitors; molybdate tracers; silica; hardness surrogates | Stored programs; Multi Wavelength (multi-component) |
| Boiler feedwater | Phosphate; silica; iron; dissolved oxygen surrogates; condensate quality | Stored programs; Single Wavelength (custom) |
| Industrial process water | Metal concentrations; sanitiser residuals; colour and clarity; application-specific parameters | User Programs; Multi Wavelength |
| Environmental monitoring | River and lake chemistry; stormwater quality; nutrient loading; trace metal surveys | My Workflow (multi-site); Stored programs |
Related Hach Instrument References
- Hach DR900 Multiparameter Colorimeter — 48+ Parameters, 90+ Methods
- Hach DR300 Chlorine — Free & Total Chlorine, DPD Method
- Hach DR300 Iron FerroVer® — 0.02–5.00 mg/L Fe
- Hach DR300 Phosphate — Reactive Phosphorus & Phosphonates
- Hach DR300 Bromine — DPD Method 8016, LR & HR
- Colorimeter vs Spectrophotometer — Complete Buyer's Guide
- All Commercial Water Lab Guides